.png)
 Tweet
Tweet
I have some work that was machined and bears the swirls, ridges, and other marks from machining. What is the best way to remove these? I bought some buffing wheels for my drill and tried some of the black (emory) stuff. 10 minutes of running this over it and it didn't seem to do a thing. The metal is 4130 (I think).
-
-
read my post here and apply all info gleamed to all polishing
.png)
You got to start rough to end up smooth !
now that's a good one to put at the end of my posts ..what do you think guys
all the best..mark -
Mark is right. Unless you want shiny machine marks, you gotta cut 'em down first.Comment
-
You have to get th machining marks down to absolute minimum to none. My method - and some changes do occur, but this is generally it: First note, be sure to really clean off the part between steps, and work is minimal. Without cleaning, you leave little grits of larger sizes, or stray metal chips from the abrading to work into the next step.
I would say about one minute for each step - if you clean right, and leep papers separate to prevent contamination (yeah, I am a rel pain, but my polishing time is very minimal, probably due to this) - for the pics below. Steps: Sandpaper: 120 grit, 240, 320.
320 Bear Tex or scotch brite. Here is where I make the machining marks disappear. I take the scotch brite and run it up and down a lathe part real fast to create a cross hatch (like a knurl pattern) rather than going in the same direction as the turning. back to sandpaper - crosshatching -
Back to sandpaper - 400, 600 wet or dry with alcohol or WD 40 as the moisture.
Then to 800 clover compound on a very small (1x1, folded over) and very clean cloth, then 1000 Clover on a clean cloth - seperate, never mix the compounds or you have runied a can.
Off to the buffing wheel - red rouge, then I use a white very fine jewelers rouge, or even a piece of white chalk - different wheels to prevent abrasive grain cross contamination, and keep it real clean between steps.
Final hit for looks - back on the lathe, I use 3M chrome polish - pink, costs about $10.00 per 6 ounces, but one can is now 3 years old.
My results:

[This message has been edited by spope14 (edited 07-02-2005).]CCBW, MAHComment
-
I use a similar method, I have a large lot
sandcast aluminum to polish, good material but sandcast is rough. I work the casting over with a flap wheel and a drill, then shift to
scotch bright pads on a drill motor. I coat
one pad with 100 grit lapping compound, then 220 and 600 after working the casting for about ten minutes with each each grade I shift to simichrome polish, it cleans up well.Non, je ne regrette rien.Comment
-
Maybe the biggest tip some guys will get is to not cheap out on sandpaper. Buy all the grades and use all the grades. When prepping a gun for engraving I frequently started with 80-100-120-180-200-300-400-and a buff with semichorme on hard felt pads.
He told me to use the next higher grade to eliminate the scratches of the previous by sanding 90 degrees to the previous scratches. I also used 1/4ounce leather for a backer cut in 2"x4" pieces. It takes less time if you do it right and don't cheap out.
Remember you can't buff out deep scratches. You can only make them weep out and rob your project of any crisp definition. I wouldn't buff until I reached a 400 grit finish. I never buff edges. If you buff the flats the edges can't help but get buffed. Nothing looks worse then a over buffed project, ESPECIALLY aluminum For a really nice buffing wheel look for a 2" wide x8" hard felt wheel. I got one at a yardsale. Guy said it was a friction clutch for an old shoemakers buffing setup. It's my prized wheel with green rouge on it.
[This message has been edited by Your Old Dog (edited 07-03-2005).]- - - - - - - - - - - - - - - - - - - - - - - - - - - - - - - -
Thank you to our families of soldiers, many of whom have given so much more then the rest of us for the Freedom we enjoy.
It is true, there is nothing free about freedom, don't be so quick to give it away.Comment
-
if you want to bypass all the sandpaper work, go to Brownells website, they sell greaseless polish and wheels for it from 120 grit and up.Comment
-
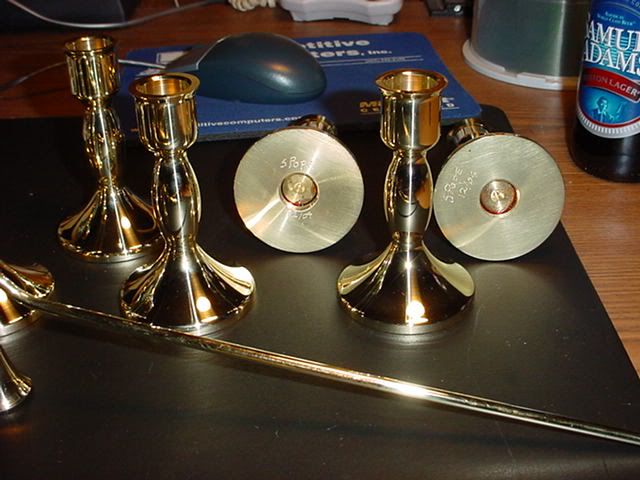
First off, do you really want to polish or just remove the tool marks? If it’s remove the tool markets, what about the humble file? Traditionally it’s the first tool metal craftsmen learned to use and the correct tool for this job. A chalked, QUALITY smooth cut file will quickly get you to an attractive brushed look. Furthermore, with a file you have a fighting chance of maintaining its shape of the work and crisp edges. With free hand powered abrasives, to a great or lesser degree, you start to turn your parts into lumps – everything starts getting round out – surfaces, corners etc.
From an aesthetic viewpoint, for a lot of shop stuff or models a polished surface is not appropriate and the attractive finish the file produces is more than enough (perhaps followed with some emery cloth). The is of course from a general workshop point of view, items like the candles sticks show that polishing definitely has its place.
located in Toronto OntarioComment


Comment