.png)

 Tweet
Tweet
Has anyone ever made a 82 deg. countersink the way you make a d-bit. I was reading in one of the Machinist Bedside Reader that you can make one that way but take off half of the diameter. I know I could buy one but I was wanting to try this method first since money is tight. It is going to be used in SS for a couple of pieces, actually just one if I dont screw it up. Any help is appreciated.
-
-
Perhaps just regrind a drill bit?Free software for calculating bolt circles and similar: Click Here -
Furnace,
Have you looked at the single cutting edge countersinks? It has a hole drilled through it perpendicular to the angle. They seem like they would be real easy to make. Try page 76 on www.kbctools.com
[This message has been edited by david_r (edited 09-19-2005).]Comment
-
The D bit technique can be used for any boring type cutting tool.
Countersink,counterbore, drill, reamer and anything else you might think of can be easily made with this method. It is a useful method, and should be mastered by the HSM, as frequently a cutter is needed for one job that would be too expensive otherwise.
The Weldon style one hole countersinks need a rather tricky backing off operation to work properly.Jim H.Comment
-
How big is the diameter do you need? What size hole are ya working on? I've got a lot of used ones laying around and I'd be glad to send ya one.
------------------
Smitty.... Ride Hard, Die FastSmitty.... Ride Hard, Die FastComment
-
JCHannum,
Could you elaborate on the technique required for the best use of the one hole style countersinks. I'm not sure I've been using them correctly.
Thanks,
Sandy.Comment
-
Sandy;<font face="Verdana, Arial" size="2">Originally posted by Sandy H:
JCHannum,
Could you elaborate on the technique required for the best use of the one hole style countersinks. I'm not sure I've been using them correctly.
Thanks,
Sandy.</font>
The backing off I am referring to applies to the sharpening of these countersinks. They are used in the normal manner.
Jim H.Comment
-
furnace,
though i've never made one myself, JC is right.. i have a few i've tried to "sharpen" with varying results. couldn't imagine trying to get one right from scatch.
then again, depends on how nice you need the countersink to look/work.
anything with an edge, and spinning, with a little hard headed determination, will cut metal
i have made a few good (read: work well) 3flute countersinks with the mill and rotary table.
3flutes, if not held firmly, will wobble and give you a triangular hole. but i went for the 3flute as it seemed easier to shape offhand on the grinder without damaging the next cutting edge -- gave me some breathing room.
shape it to just shy of the edge, then finish with a fine file and a stone.
heat treating is a bit tricky (make an extra one while you have the lathe loaded) as the quenching can cause some serious distortion.
honing after hardening is essential for clean cutting.
-tonyComment
-
Another method that has worked well for me is instead of milling away half of the the tool is to only mill a quarter of it. Then use a belt sander to grind the clearance. The extra material gives more support for the tool so it can be used by hand without digging in.
JimJim Koper
J&R MachiningComment
-
Thanks for the help guys. Im going to try the the d-bit style first and if that doesnt work im going to try jkoper's method, I think, I dont quite understand the relief part. And bikenut Im too new at this to have anything to give you in return, but where in the heck are people like you guys around here.Comment
-
furnace-
"relief" is the space immediately behind the cutting edge. without relief, the entire tool body would rub its way around the work because the extra material behind the cutting edge won't let the edge cut your material.
imagine a wood chisel.. one side is flat all the way to the cutting edge. the other side has a bevel. the 'bevel' is the relief.
now imagine breaking the handle off and rolling that chisel into a cone shape .. so it looks like a big ugly countersink.. see where the relief angle ends up? if you rolled it up one way, it would cut.. if your roll it up backwards, the chisel edge would be on the 'inside part' of the cone and never cut.
sorry if you already knew all of this.
-tonyComment
-
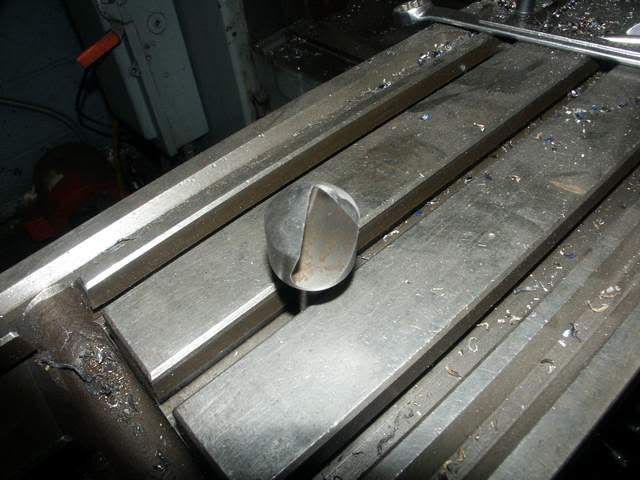
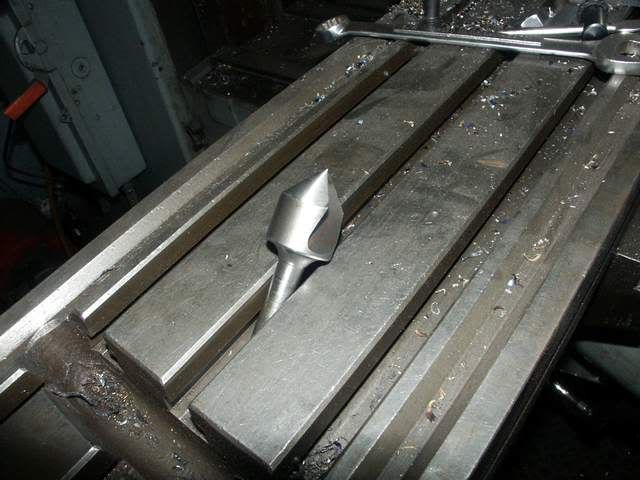
here are a couple of pics of a countersink like what I was talking about.
Jim
------------------
Jim Koper
J&R Machining
[This message has been edited by jkoper (edited 09-24-2005).]Jim Koper
J&R MachiningComment
-
The bit pictured is a Unibit, made by Ford (or a copy of). The other popular single flute type is by Weldon (much copied), sometimes called "fish eye" type.
We've used both of these type for years. And have the sharpening fixtures from the respective companies. Even with the dedicated fixtures it can be tricky to sharpen them correctly with the right amount of relief.
Just recently I noticed in the sales literature these type countersinks are only meant for soft non-ferrous material. We use them for everything, which could explain why they dull so quickly. Their cutting edges are fragile.
It may only be a good learning experience making a single flute countersink for working SS. It's doubtful it'll have much life or cut well since the factory ones of HSS don't last long in SS.Comment
-
Here's an illustration on the clearance or relief thing:<font face="Verdana, Arial" size="2">Originally posted by Furnace:
Thanks for the help guys. Im going to try the the d-bit style first and if that doesnt work im going to try jkoper's method, I think, I dont quite understand the relief part. And bikenut Im too new at this to have anything to give you in return, but where in the heck are people like you guys around here. </font>

The first drawing shows a tool without clearance. It is just a flat surface that slides over the flat surface of the workpiece. It can remove any projecting bumps or hills but will not "dig in" to remove any metal below the present, flat surface. I have shown a relatively large flat under the tool but even a small flat will prevent penetration. If you don't believe this, take a standard twist drill bit, perhaps 1/4", and drill into a piece of relatively soft material like wood. Now, with the drill still spinning in the hole, try to move it sideways. It will be hard to do. If you manage to cut sideways for any distance, you will see smoke and the drill will heat and discolor. Now stop and look at the drill. Look at the relatively narrow "margin" area on the edges of the flutes. It is about 1/32" wide or even less. But even that small unrelieved area will be very effective in preventing that edge from cutting into the wood. It would be a lot harder in metal. By contrast, an end mill or a router bit does not have those "flats" on it's flutes and it will easily cut sideways.
The second drawing shows that a tool with clearance can dig in as it is actually slideing down the ramp underneath itself that it is creating as it cuts.
The third drawing shows the actual clearance angle on the tool.
The fourth drawing to the right attempts to show the relief or clearance angle on a drill. It is produced by grinding away some of the material on what would have otherwise been a conical shape. So the cutting edge is effectively higher than the area behind it and it can "dig in".
All cutting tools need clearance or relief to cut. The best angles will vary with the material being cut and even with the style and material of the tool.
Paul A.Paul A.
s
Golden Triangle, SE Texas
And if you look REAL close at an analog signal,
You will find that it has discrete steps.Comment
-
Here's an interesting link to making a countersink:
The way this article suggests how to cut the back-relief is very clever! Well worth your time reading it.
________________
[This message has been edited by Mike Burdick (edited 09-21-2005).]Comment


Comment