.png)

 Tweet
Tweet
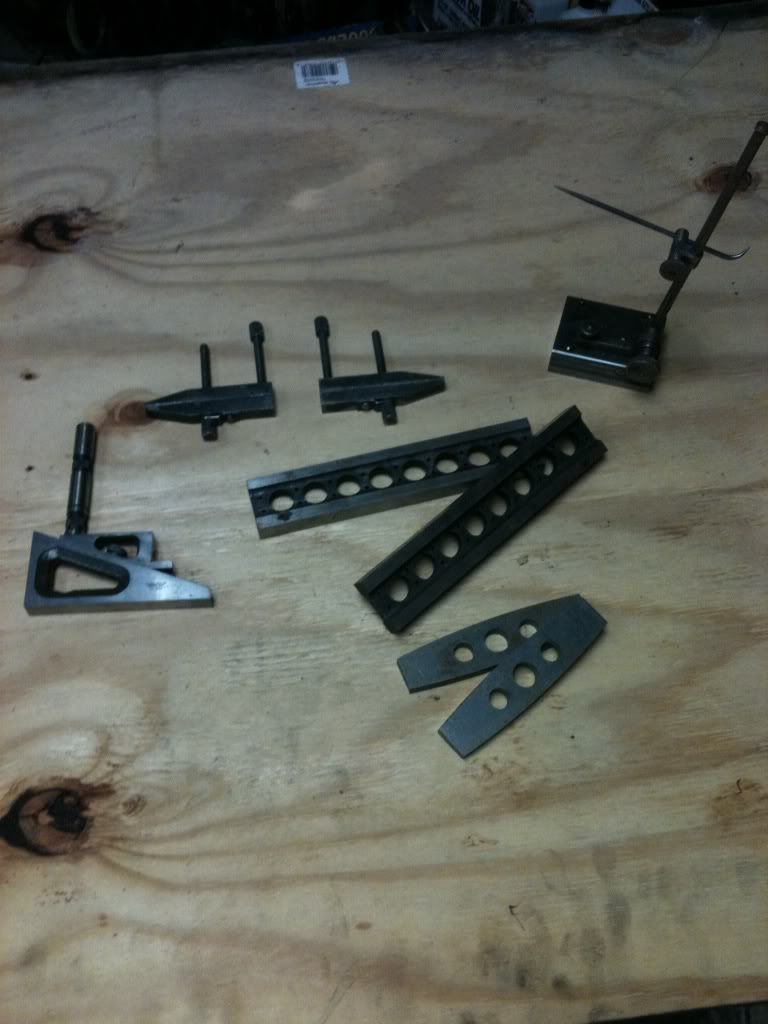 I know what the parallel clamps are. The rest not so sure. They were part of a lot that I picked up. Included but not shown is a Craftsman made Kennedy style box, a hand full of end mills, some Kant-Twist clamps, and a metric poop ton of worn out drill bits, taps, reams, ect. The tool with the heavy base, vertical upright and a scribe looking thing, I figure that is for transfering heights of tooling, and marking work pieces. The 2 triangles and the upright post tool, well the one slides up and has a level on the lower half. The one kinda in the center of the pic is like a set of I-beams. The last tool looks home made, the oval edges are plasma cut and the center holes are drilled. Any Ideas?? PS I am out in the shop practicing the internal threading project I have been getting input on. I will be posting pics if it works out!!! Keith
-
I know what the parallel clamps are. The rest not so sure. They were part of a lot that I picked up. Included but not shown is a Craftsman made Kennedy style box, a hand full of end mills, some Kant-Twist clamps, and a metric poop ton of worn out drill bits, taps, reams, ect. The tool with the heavy base, vertical upright and a scribe looking thing, I figure that is for transfering heights of tooling, and marking work pieces. The 2 triangles and the upright post tool, well the one slides up and has a level on the lower half. The one kinda in the center of the pic is like a set of I-beams. The last tool looks home made, the oval edges are plasma cut and the center holes are drilled. Any Ideas?? PS I am out in the shop practicing the internal threading project I have been getting input on. I will be posting pics if it works out!!! Keith
-
The triangular thingy on the left is a planer setting gauge.
I have one, loads of other people have one but no one knows what to do with the damn things.
They are one of those must haves like precision levels that work to nanometres over 8 continents, bragging rights only but no earthy use in real life. -
Those "I" beams maybe parallels, I've seen a few like that design in my wanderings...Comment
-
Exactly right, It's called a universial surface gage here:Originally posted by 383 240z
Last edited by Scottike; 09-16-2011, 05:48 PM.I cut it twice, and it's still too short!
ScottComment
-
Like said, A planer gauge (Which I have one and have used it as an adjustable parallel), set of parallels, possible some hold downs, Couple clamps, and a surface gauge.Comment
-
Cool. Thanks guys I paid $15 for everything in the pic. I figured I could not go wrong on the price. The pile of good end mills cost me another $20, and the box set me back $12.50. KeithComment
-
For referance, a brand new Starrett planer guage is around $430 + I'm not even sure if Starrett still make them.
PeteComment
-
Originally posted by John Stevenson
They are probably not a lot of uses for a machinist, but it is a very useful tool for setting up various types of manufacturing equipment where a typical caliper isn't accurate enough or can't get access. In the tin/aluminum can industry, they are used to set the head height on Angelus double seamers which put the top and bottom on your soup cans.Comment
-
How do you put the top and bottom on at the same time??Originally posted by gzig5
I mean, Ok, how do you do it with contents inside the can?
I allways kinda thought the bottom would be put on, filled, then the top put on by another machine.Play Brutal Nature, Black Moons free to play highly realistic voxel sandbox game.Comment
-
What you bought are (some) of the essential tools for a Tool & Die Maker. The most important tool is the "Planer Gage" (the triangular thing).
Here is how you use it:
You need a surface plate to set the gage on. You can set it on any one of the two sides, depending on the height of your work. Using an indicator you transfer a dim. from your work to the surface on the gage. You do this by sliding the movable section up or down until your indicator reads zero - zero on your work and on the gage. Now you add gage blocks to the surface of the gage for your desired dim.. Next you set your indicator to zero at the top of the gage blocks and transfer the dim. to your work. There are many other uses for this gage but you would have to ask a Tool & Die Maker to show you.
This is a precision instrument. The gaging surfaces will always stay absolutely parallel to the surface plate as you slide it up or down.
The two clamps are called "Parallel Clamps". They are needed to clamp two parts together or hold a part on an angle plate etc.. "C" clamps will not do the job.
The "Sriber" on top right can also be used to hold an indicator to be used on a surface plate and among other things transfer dim's. to the Planer Gage.
Instead of having a sharp pointed scriber you replace it with an adopter pin to hold your indicator.
The "Parallels" are used to bring your work piece to the right height in a vise or to raise your work on the surface plate. They are precision ground and every Tool & Die maker has a set of parallels consisting of five or six or more.
Always two of different height.
In today's world the planer gage is often replaced by a "Cadillac" ($$$$) gage.
Only - the Planer Gage is so much smaller and sometimes you need to get into some tight corners.
Complicated??? Only takes about 3 1/2 years as an apprentice and than you start learning. But if you are willing and know a Tool & Die maker who can show you - it' a start. Good luck.Comment
-
You have to be very fast.Originally posted by Black_MoonsJim H.Comment
-
You got a very good deal for $15.
The surface gage (the thing with the hooked scriber) is not something I use much anymore since I have vernier height gages but there are still times when it comes in very handy to have one around. The I beams, as someone described them, are indeed parallels for set-up on the mill. The toolmaker clamps have advantages over C clamps in some applications and are well worth having. Though not many of us use a planer I agree with macona that the planer gage can be used as an adjustable parallel and two of them (which I happen to own) can be used with a long straight edge (hypotenuse) to make a long sine bar by spacing between with gage or 1-2-3 blocks (to set the 'side-adjacent'). I have no idea what those oblong bars are.Comment
-
Here is a silly question, Could I put the vertical arm of the planer guage in my mill and bring it down to the table to check that my head is square?? I have been having a heck of a time getting it square useing the put a dial ind. in the jaws and spin it method (thats the technical term right?) as somebody in my mills past decided it was a good idea to mill the table, It is pretty level, When I put my big vice on the table, I need to add .006" feeler guage to the left hand side to bring it to level. I am not certain that the problem in in the table, as somebody has welded lugs on the botom of the vice???? I have NO idea why they did that. I am seeing why this mill was only $350. Anyway I do know I can get the head trammed in to the point where I can put a dial ind in the mill and run the vice under it from left to right and see 0.000" movment on the dial. KeithComment
-
There really is no adequate substitute for the indicator in tramming the head of a mill as far as I know. I know what you mean though, it can be a pain sometimes. One of the keys to getting the indicator to work well is a firm fix on the tramming bar which should in itself be beefy. Also, when you get close you have to rely on just the tightening and loosening pressure of the nuts sometimes because even that will affect the accuracy of the tram.Originally posted by 383 240z
If I had nothing to use other than that planer gage to tram the head I'd center the body to the shaft (which in itself might be a chore) and then bring it down lightly to the table with cigarette paper under each end between the edges of the gage and the table and check the drag on the paper till it is equal on both sides, then turn the spindle so as to align to the other axis and do it again. I'd be interested in hearing if this works out for you. I admit that I've never done it this way but it might get you close. If you had a way to attach and center a long and reliably parallel bar to the bottom of the gage (I'm thinking some recessed and powerful round magnets) you could increase the accuracy of this technique. [EDIT: for that matter, the more I think of it, you could just make a tool such as this a lot easier than using the planer gage and make it whatever length you like.]Last edited by DATo; 09-18-2011, 09:41 AM.Comment
-
what are the ovalish shaped parallels at the bottom of the picture
all the best.markjComment


Comment