.png)
 Tweet
Tweet
That's one of the better MIG machines -- we have one at work that I use on smaller stuff. Super reliable and easy to use.
-
25 miles north of Buffalo NY, USA -
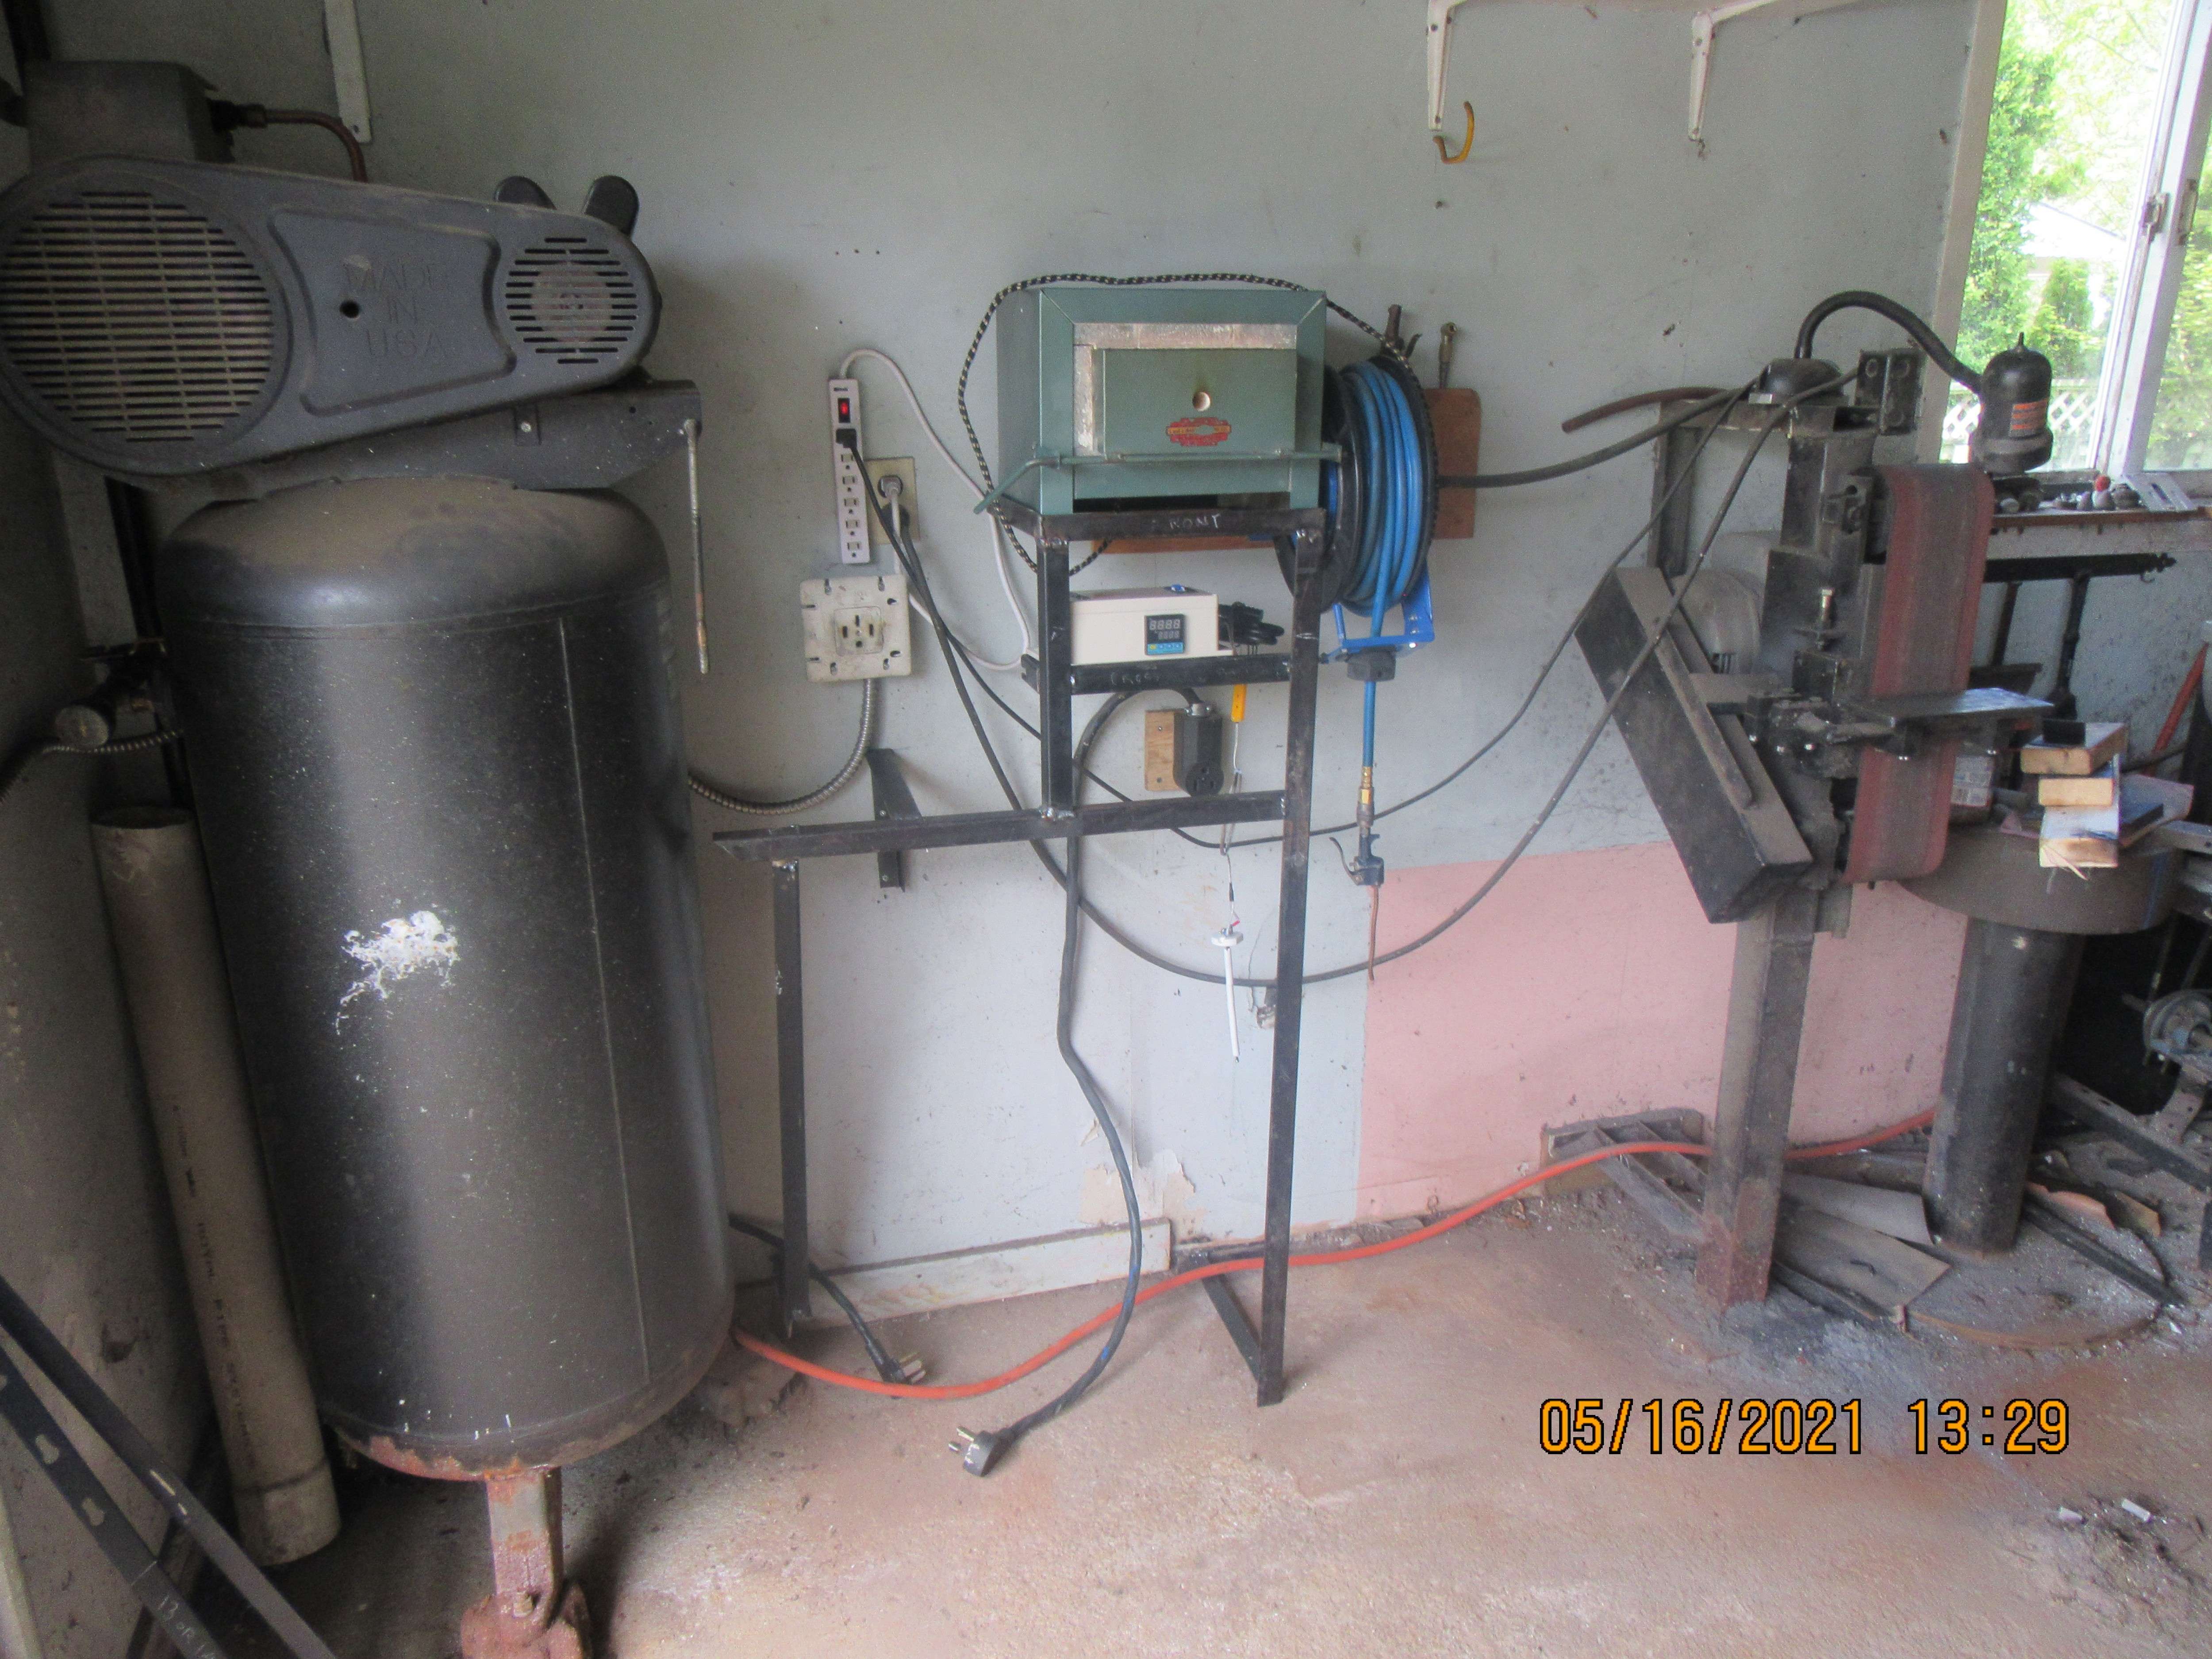
The frame is completely fitted and tack welded, and the oven and control are in place for test fit. The old red stick welder fits right in where it always sat, but I have it removed right now because I had to get down where it was to put some woodscrews into the framing on that wall. I'm going to move that air hose reel about three inches to the right, and all the stuff that was hanging on that wall is going to hang on a different wall. I'm quite happy with this. I will now put the oven and controller back in the house, take down the frame, and finish welding all the joints.
 Brian Rupnow
Design engineer
Barrie, Ontario, CanadaComment
-
That is one impressive looking belt grinder by the way...25 miles north of Buffalo NY, USAComment
-
Nickel---I built that belt sander when I was building hot-rod frames. About 100 flame cut plates were all sanded nice and smooth on that machine before assembling them on hot rod chassis. When I turn that puppy on, all the lights in Barrie go dim until it comes up to speed.Brian Rupnow
Design engineer
Barrie, Ontario, CanadaComment
-
Looks nice and welcome to the forum!Originally posted by JustJim View Post
What did you wind up using for the gasket around the door?Comment
-
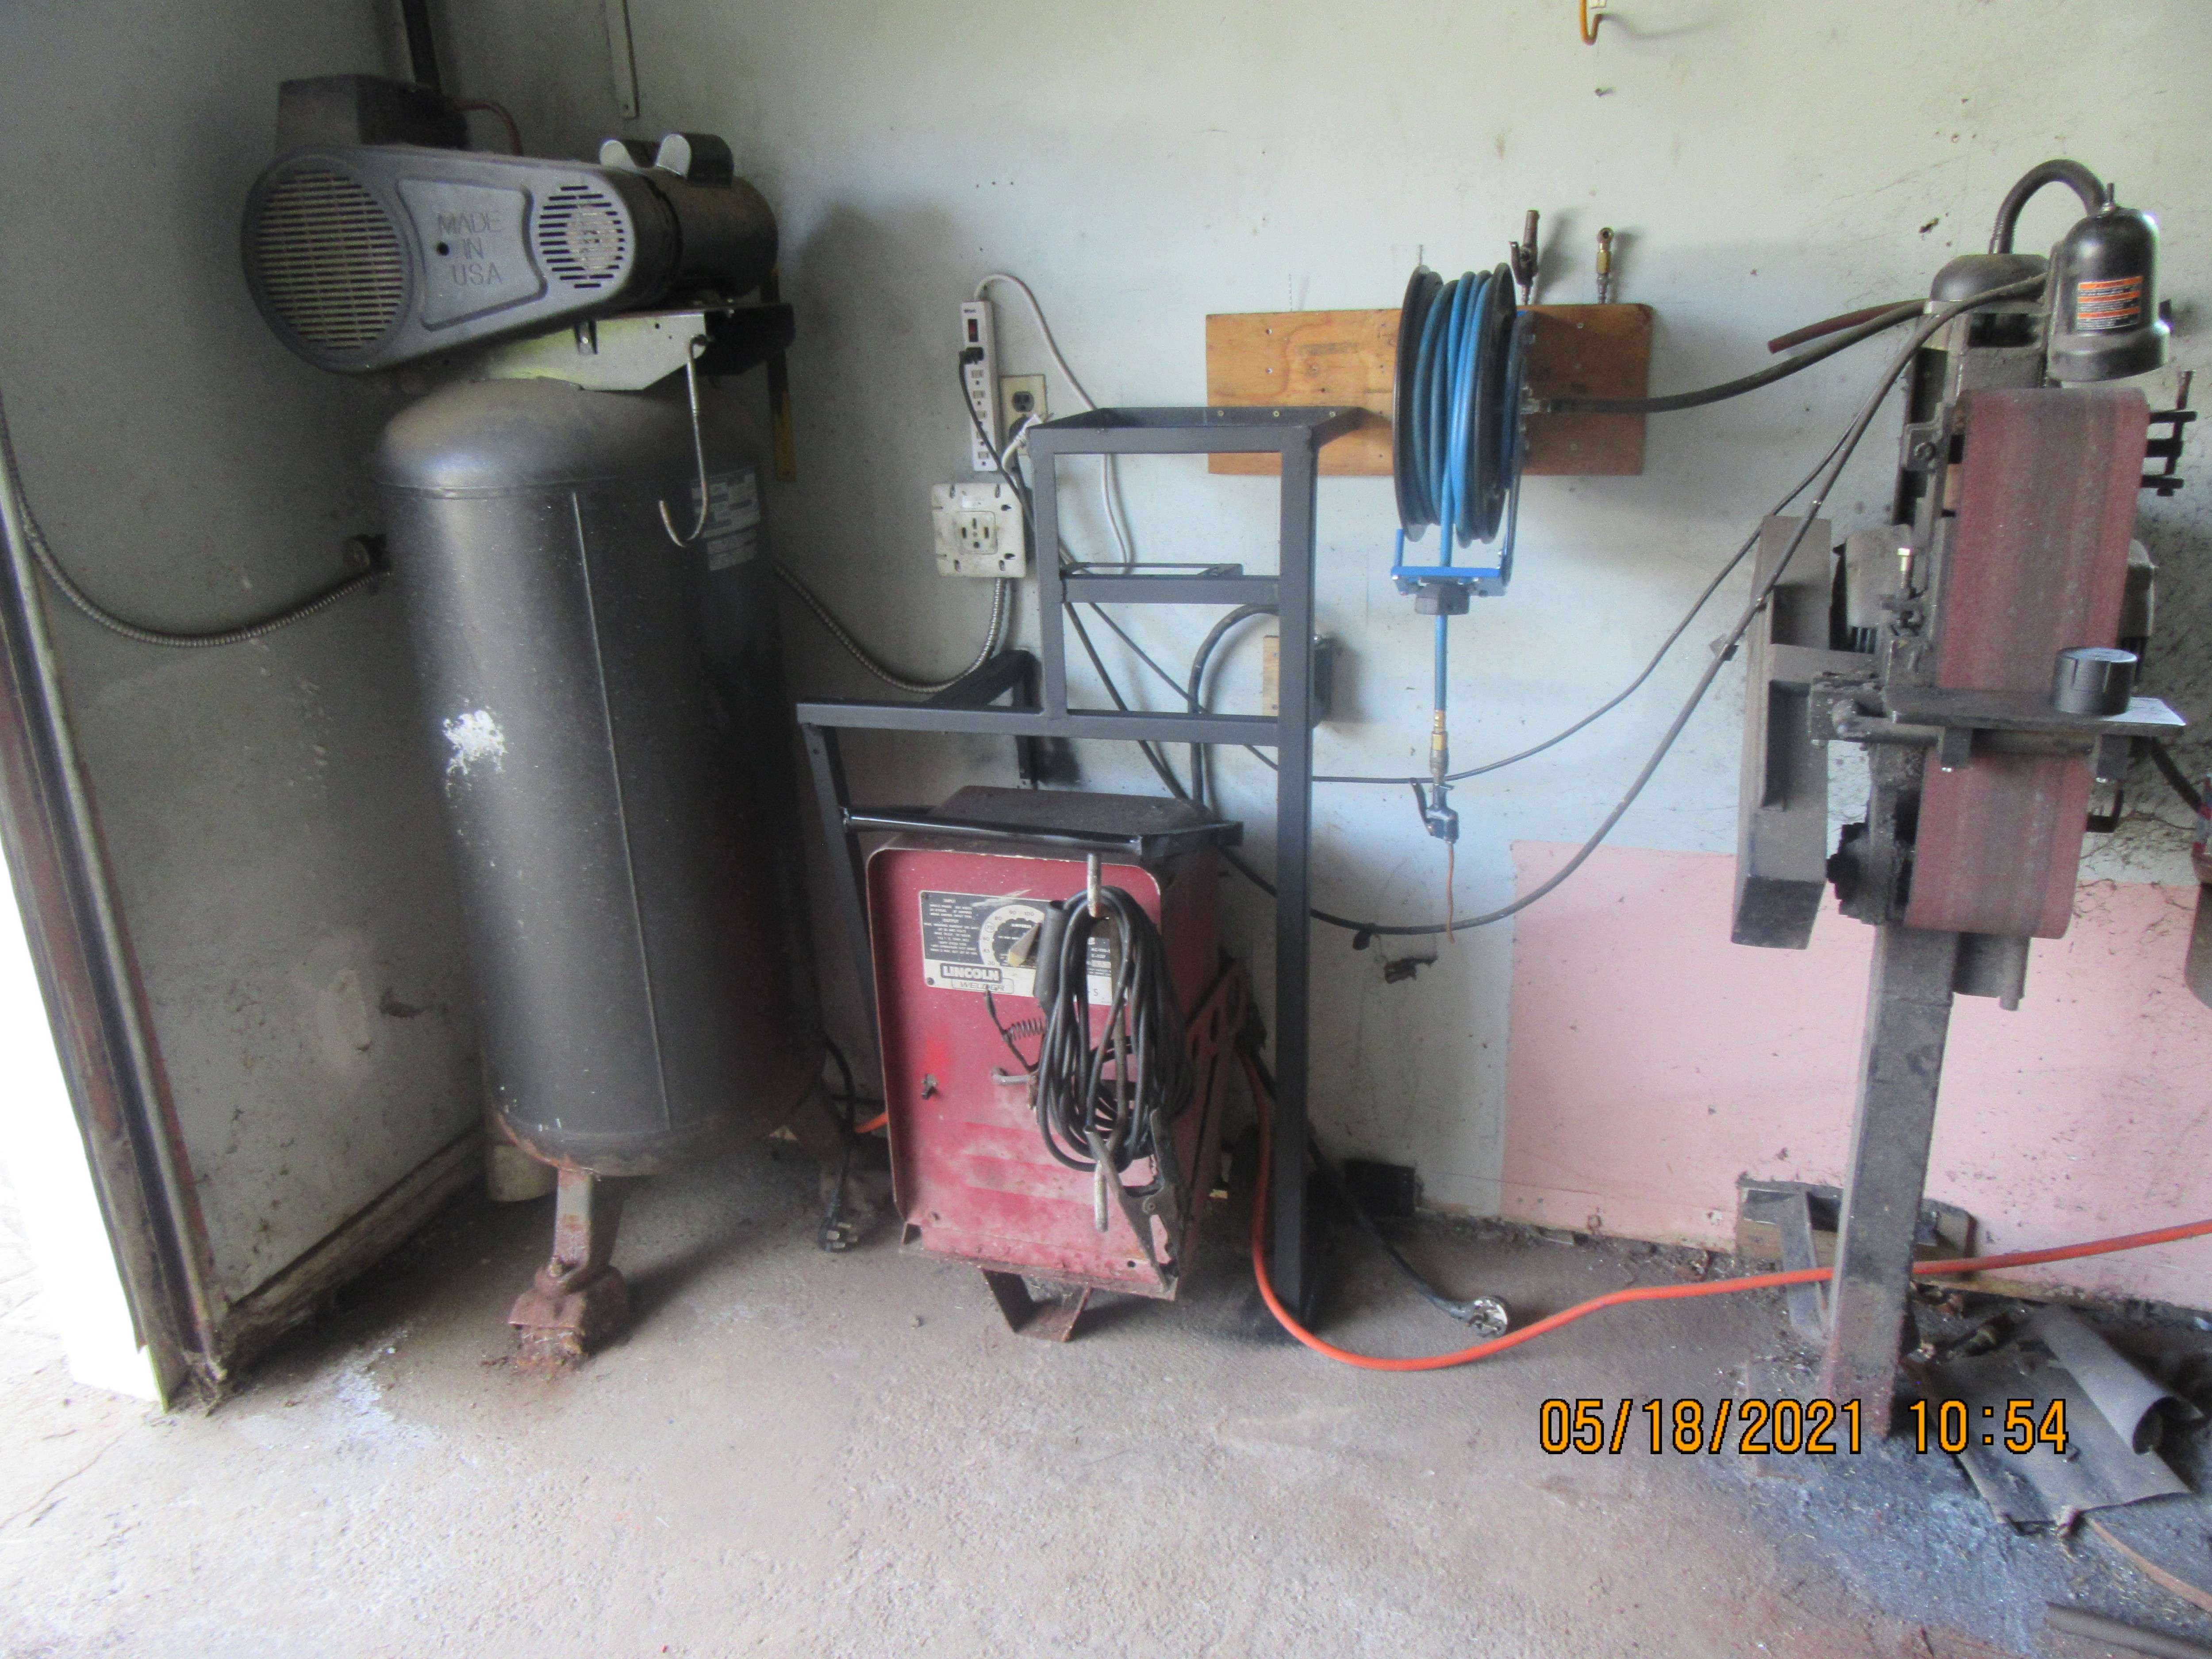
The frame that supports the heat treat oven is finished. It is fully welded and even painted. The old Lincoln A.C. welder even got a new handle out of the deal.--It had a handle on it to move it around years ago, but for some reason I had cut the handle off, and I can't remember why. The next stage of this game is going to involve figuring out the control for the oven. It is intimidating because it has to be programed, and I haven't got the faintest idea how to do that. I have two pages of instructions that came with the controller, and I think they are written in ancient Greek or one of the "dead languages".
 Brian Rupnow
Design engineer
Barrie, Ontario, CanadaComment
-
Post the pages Brian, maybe one of us can help with “G(r)eek” .... ?Originally posted by brian Rupnow View PostComment
-
Wish I was closer than a couple hours away Brian, otherwise I'd head over to help in a heartbeat. I deal with similar controllers (and their cryptic instructions) quite often.
Do you have a brand and model # for the controller? If we can look up an instruction sheet online we might be able to assist.Cayuga, Ontario, CanadaComment
-
The really are. With color graphics and touch screens available for a few bucks, you'd think one these co's would crush the competition by updating their product...like from 1981 to 2021. I mean putting the customer through the misery of interpreting the worst written manuals ever and having to program the bloody thing by two push button a few digits is bizarre. I got one that can be program via usb plug to a laptop. I think Aha!, some bright sort has answered my prayers and gone and modernized this with slick PC software, at last! Sigh, its just about as cryptic and crappy.Originally posted by Tom S View PostLast edited by Mcgyver; 05-18-2021, 01:59 PM.located in Toronto OntarioComment
-
Okay---If I've lived right, this should be the controller and the instructions.
 Brian Rupnow
Design engineer
Barrie, Ontario, CanadaComment
-
I scanned my instructions and they all came up as .pdf files and I can't upload them. so, being Mr. Resourceful, I took pictures of them with my camera because it saves them as .jpeg and I can post them. I will be very grateful for any help.---Brian
 Brian Rupnow
Design engineer
Barrie, Ontario, CanadaComment
-
Is there an electronic display that is not shown in the photos? It seems like pretty standard stuff - we should get you up an running swiftly. A photo of the inside of that box will help - hoping to see the SSR (solid state relay).Comment
-
You can see the digital display in the very first post in this thread.Brian Rupnow
Design engineer
Barrie, Ontario, CanadaComment
-
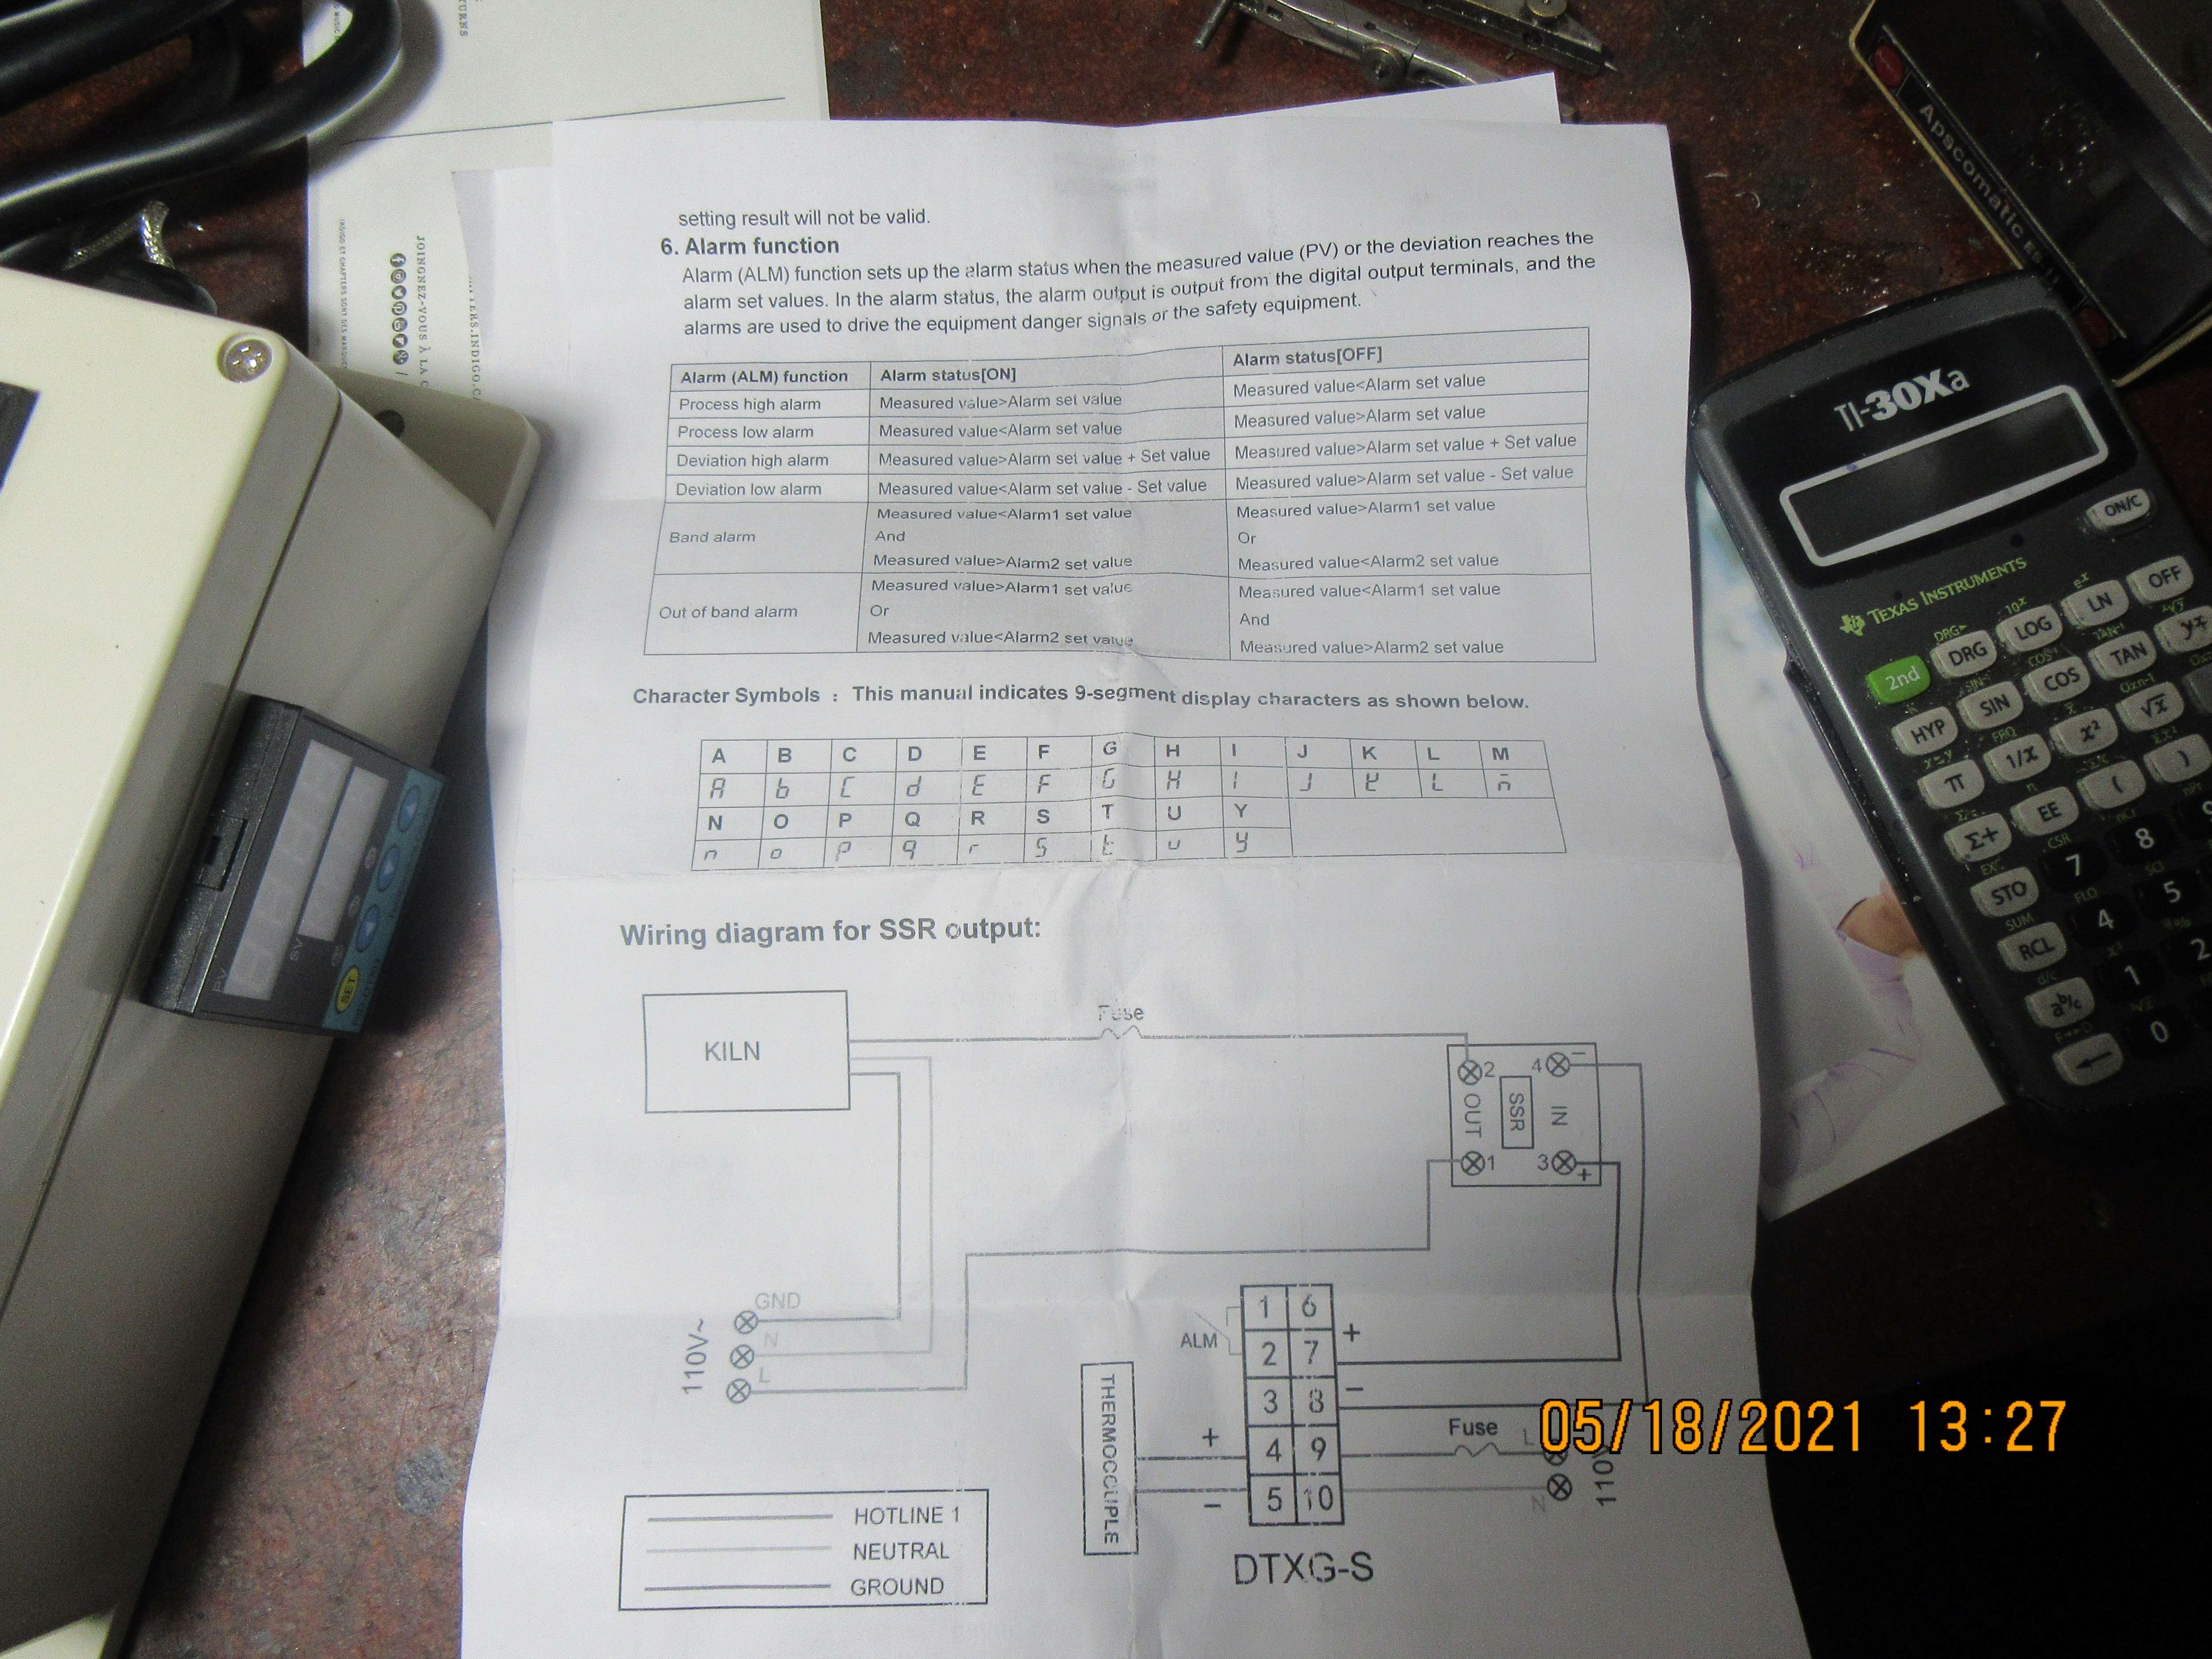
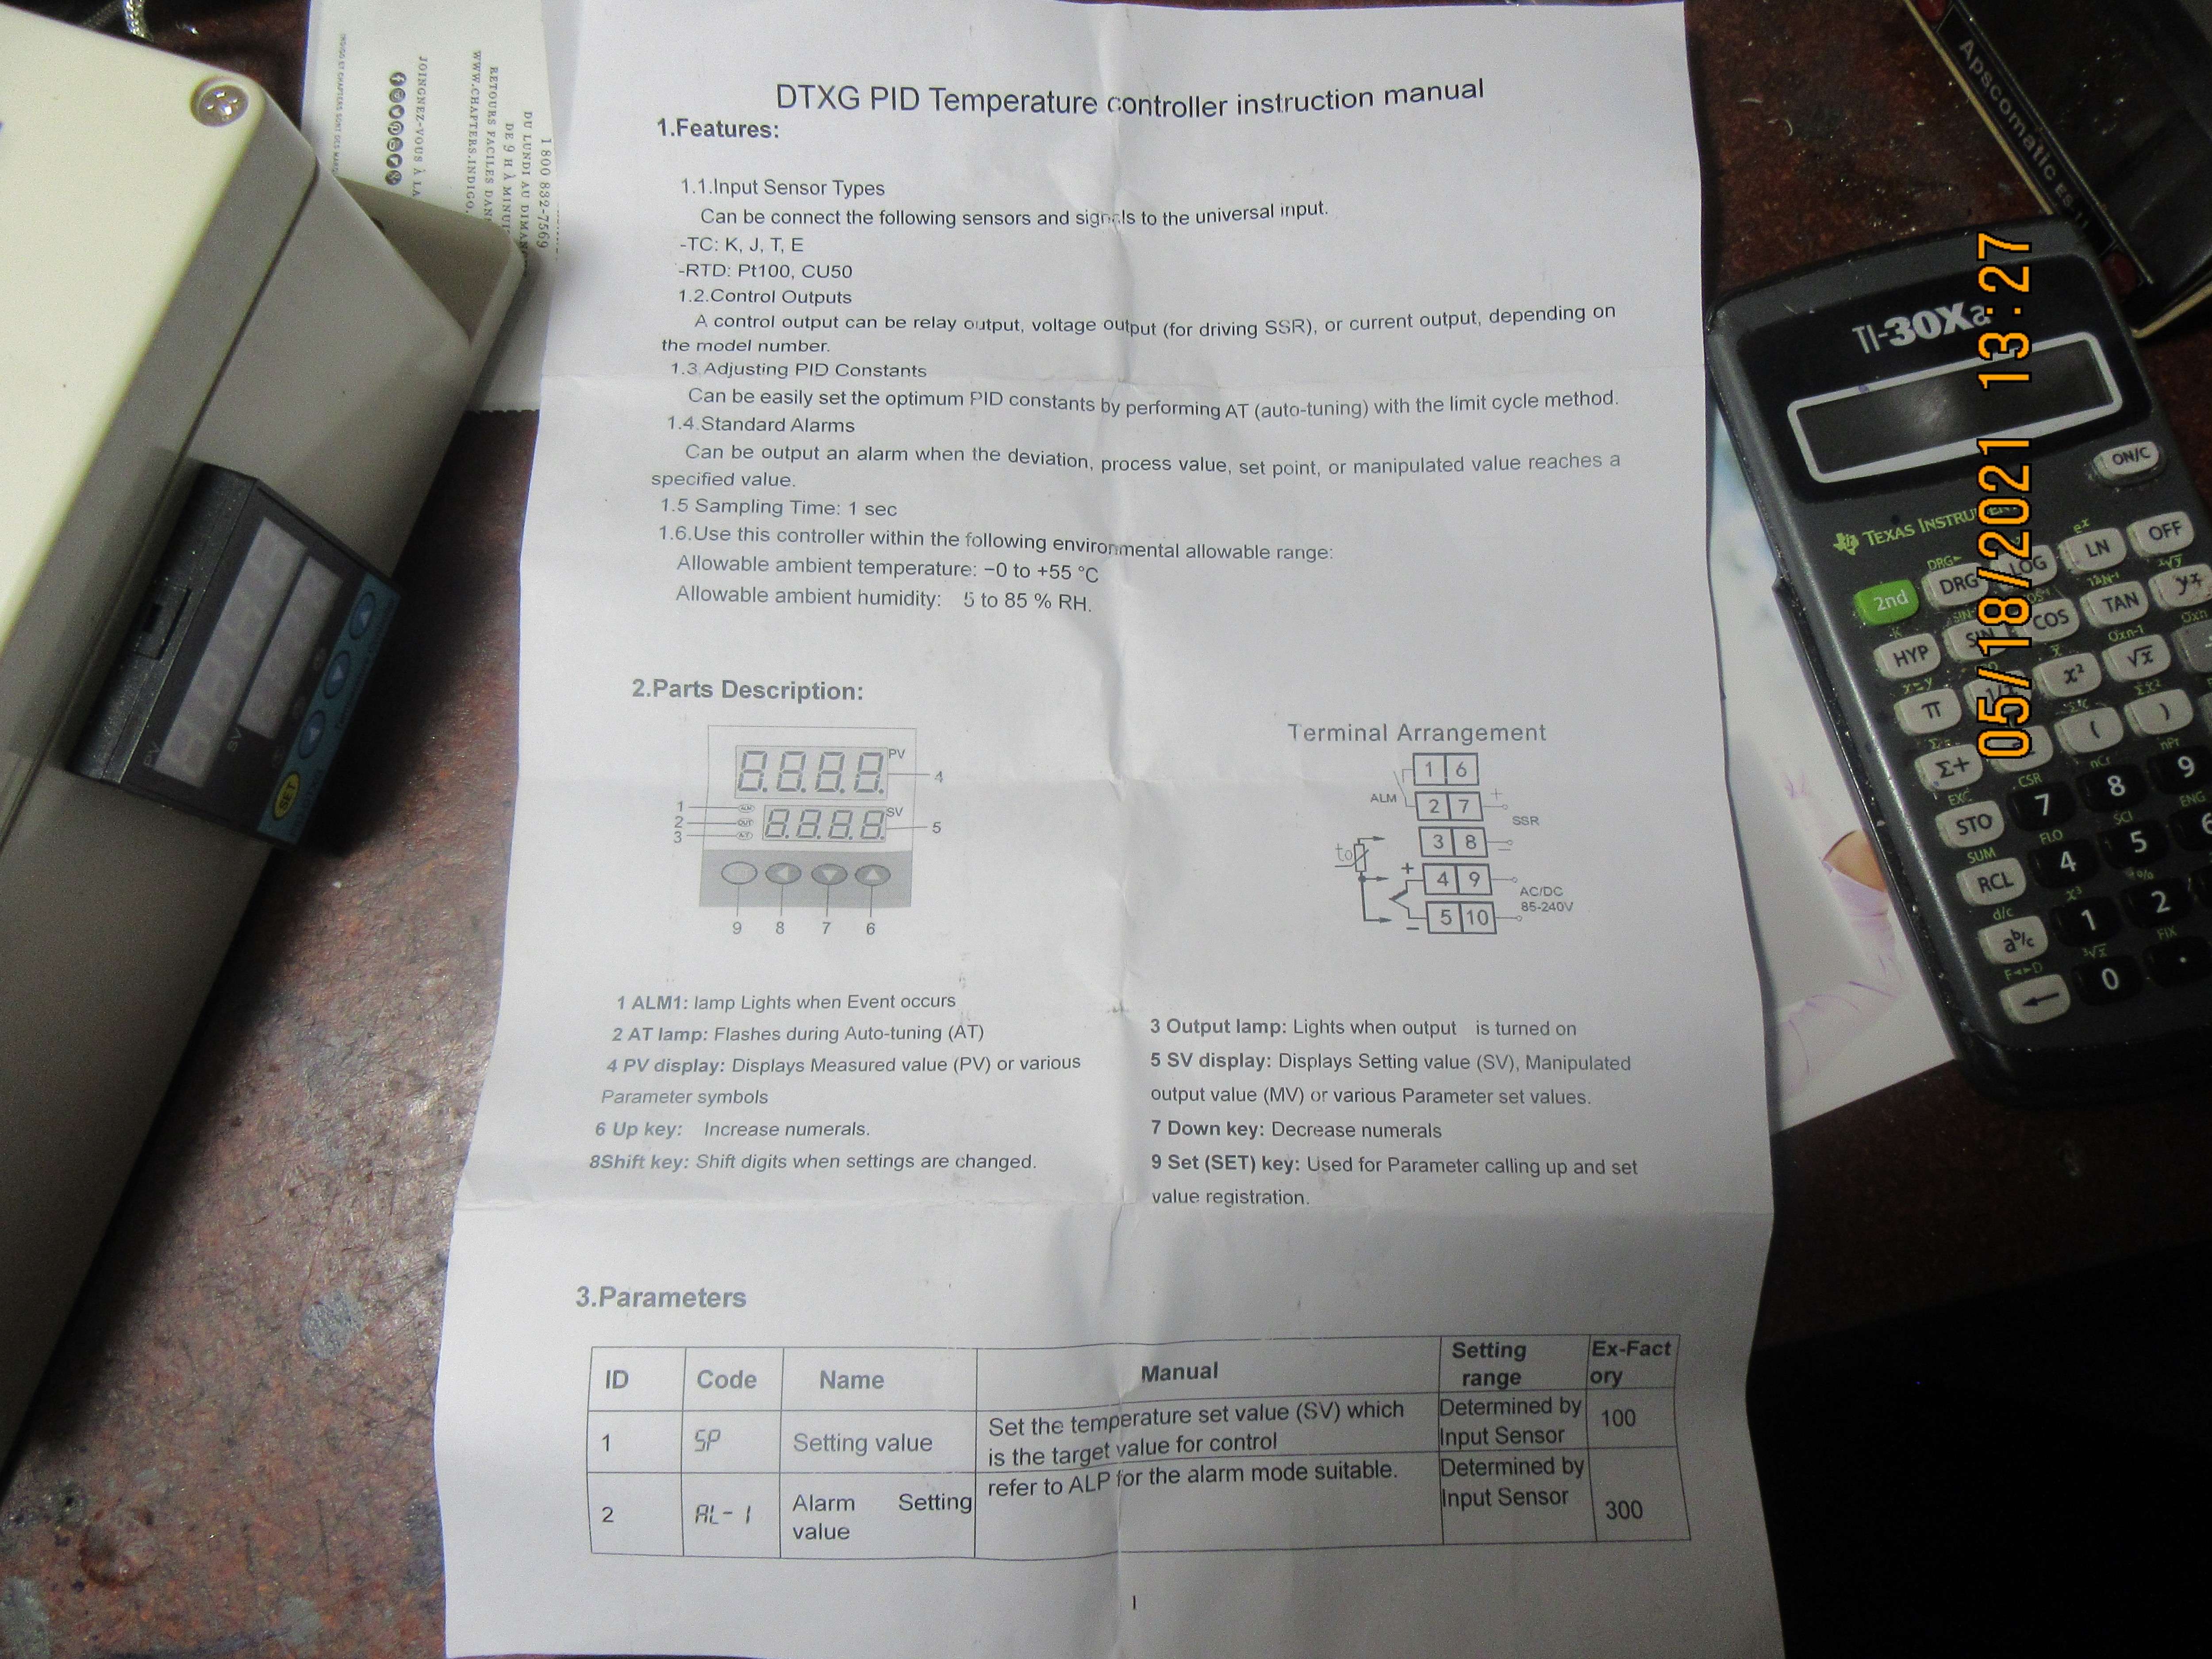
I don't think that Brian needs to worry about the wiring, looks like it's prewired and has a NEMA plug output he can plug the oven into. That thermocouple will need to be installed inside the oven however.
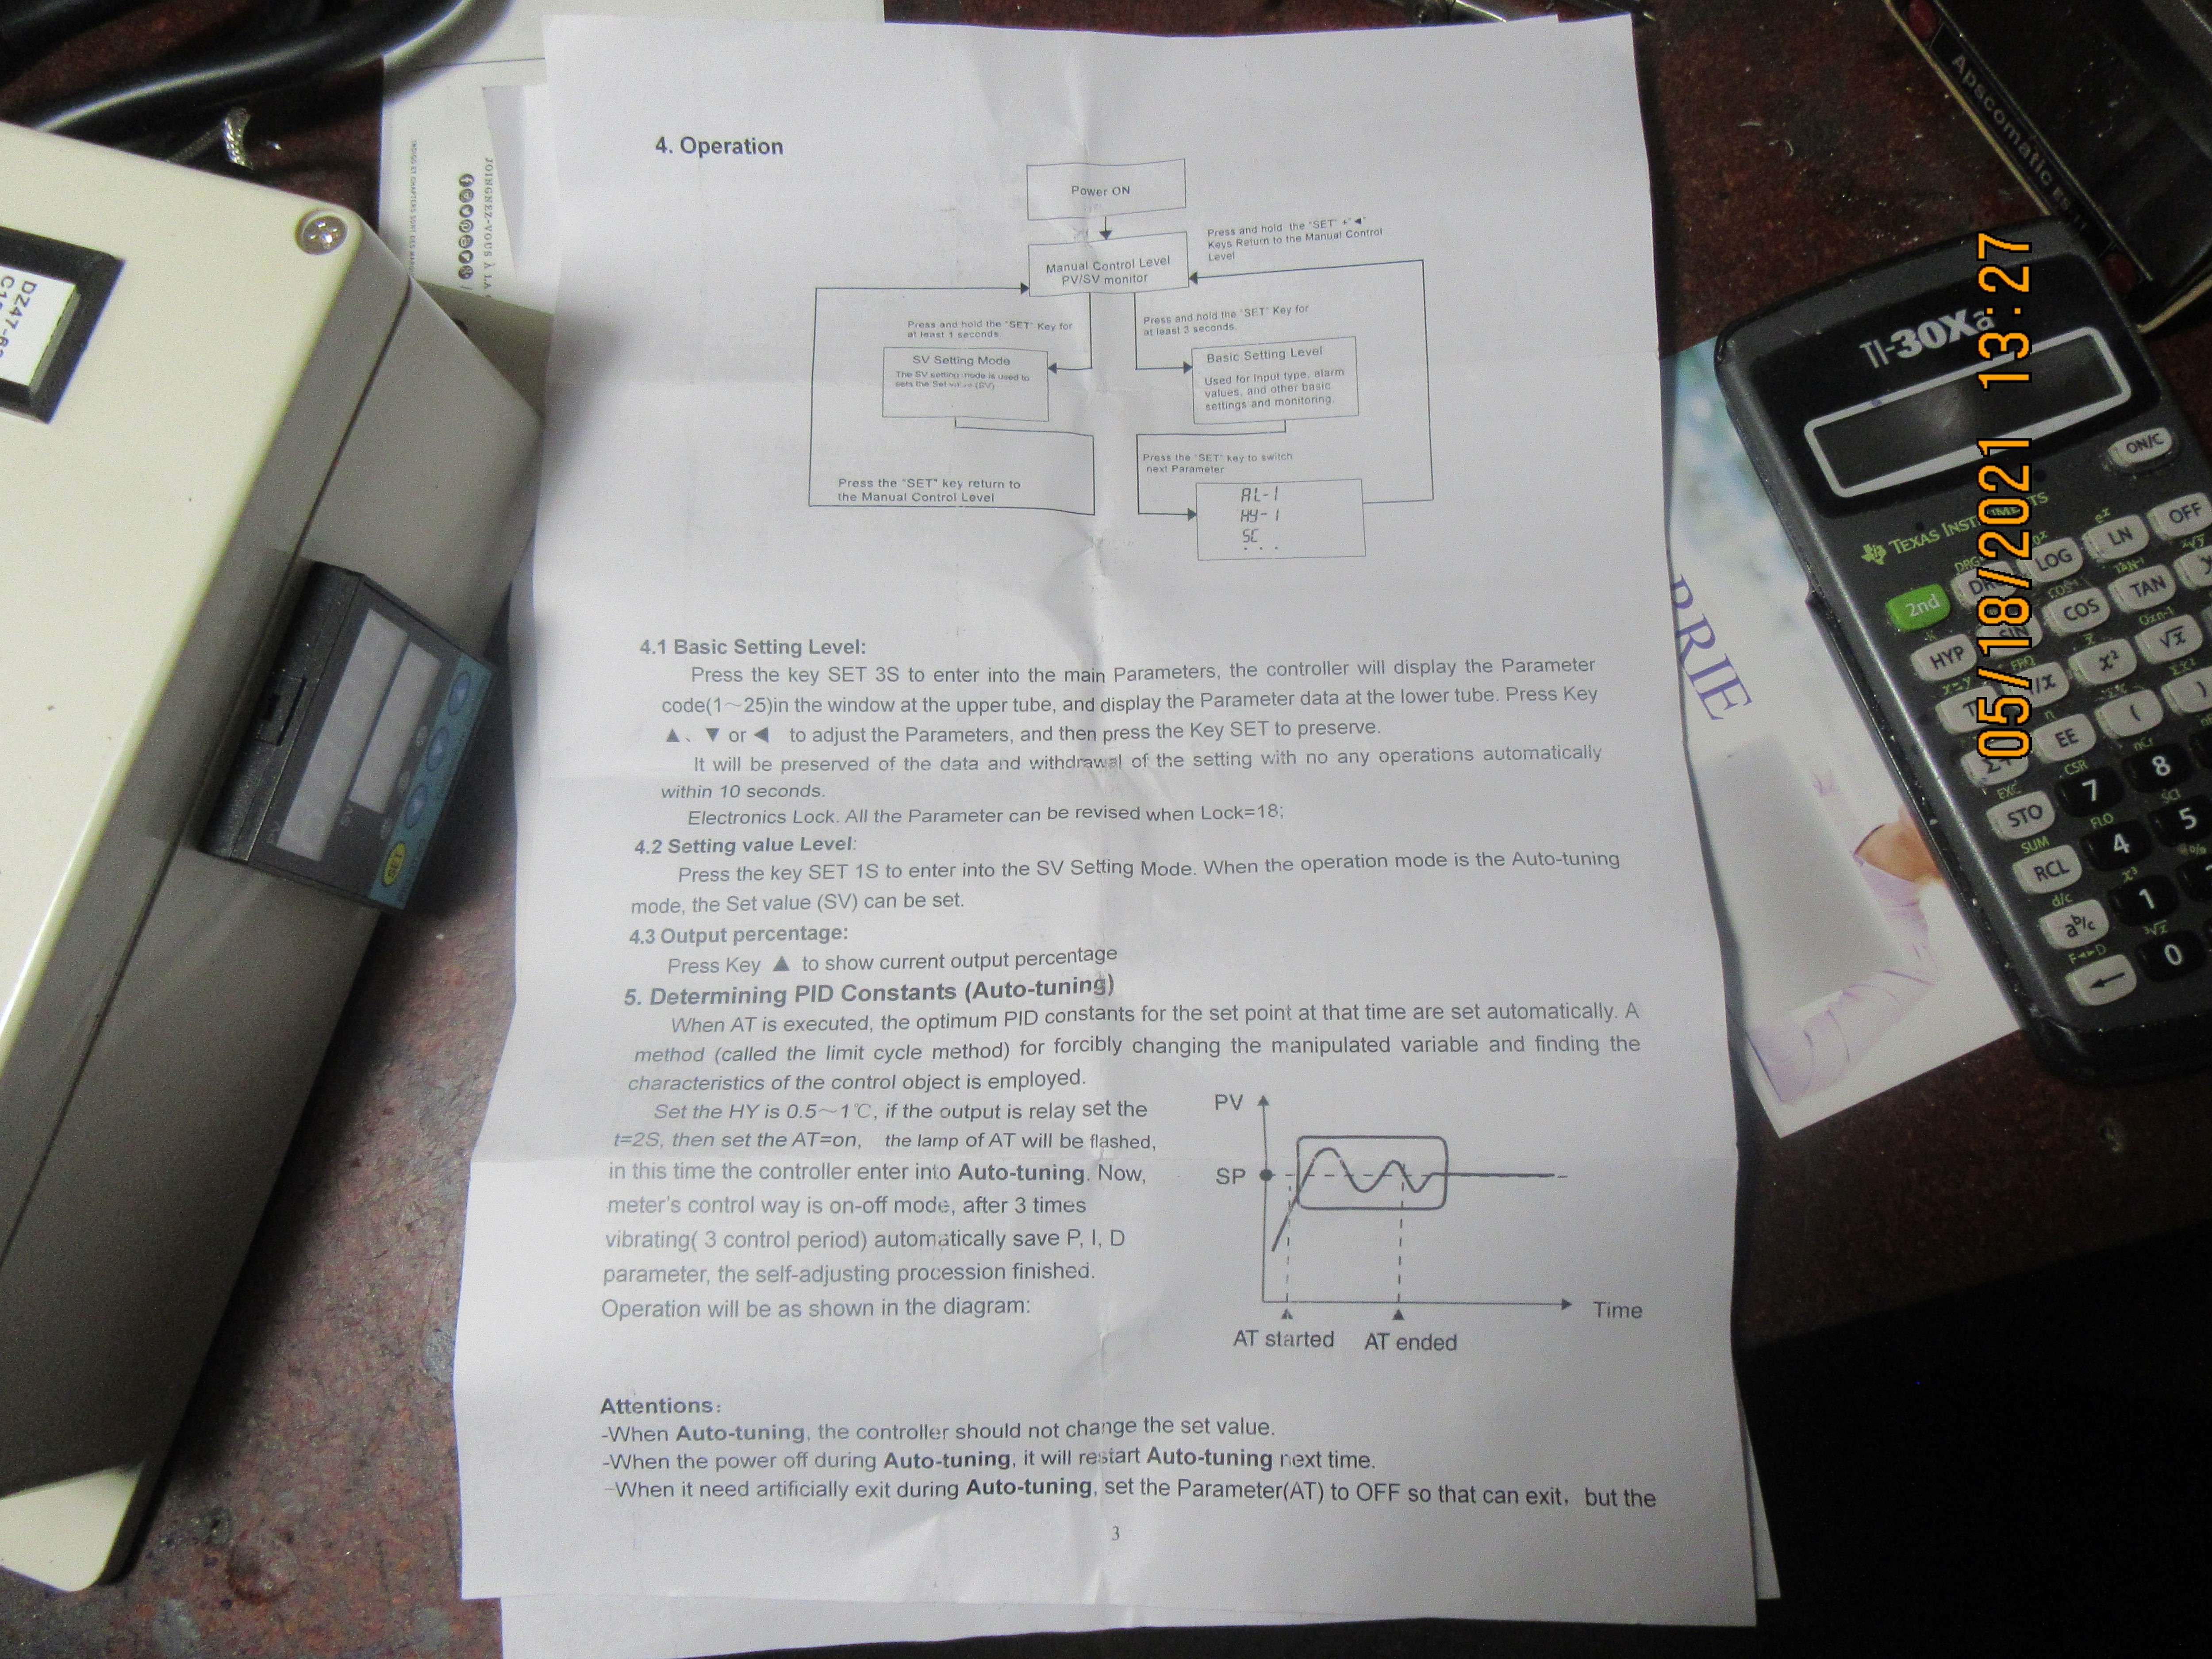
Looks like it's mostly been set up from factory to be ready to run, I'd recommend you check a few settings and run it using the AutoTune feature. See how it performs before making any other changes. I would probably also turn the alarm feature off for the time being, I'm sure you'll be monitoring the oven for at least the first number of runs and the alarm is more for process type setups.
First thing to do is check the thermocouple type (it's probably written on the thermocouple or is somewhere on the order sheet). It's set up from the factory for a type K, so if it's different we'll need to correct that. Then figure out how you're going to install it, although you may be able to just stick it through the peep hole on the door for an initial test.
Second thing will be to decide whether you want to program in F or C, and decide what temperature you want to run at. Then you can start programming.
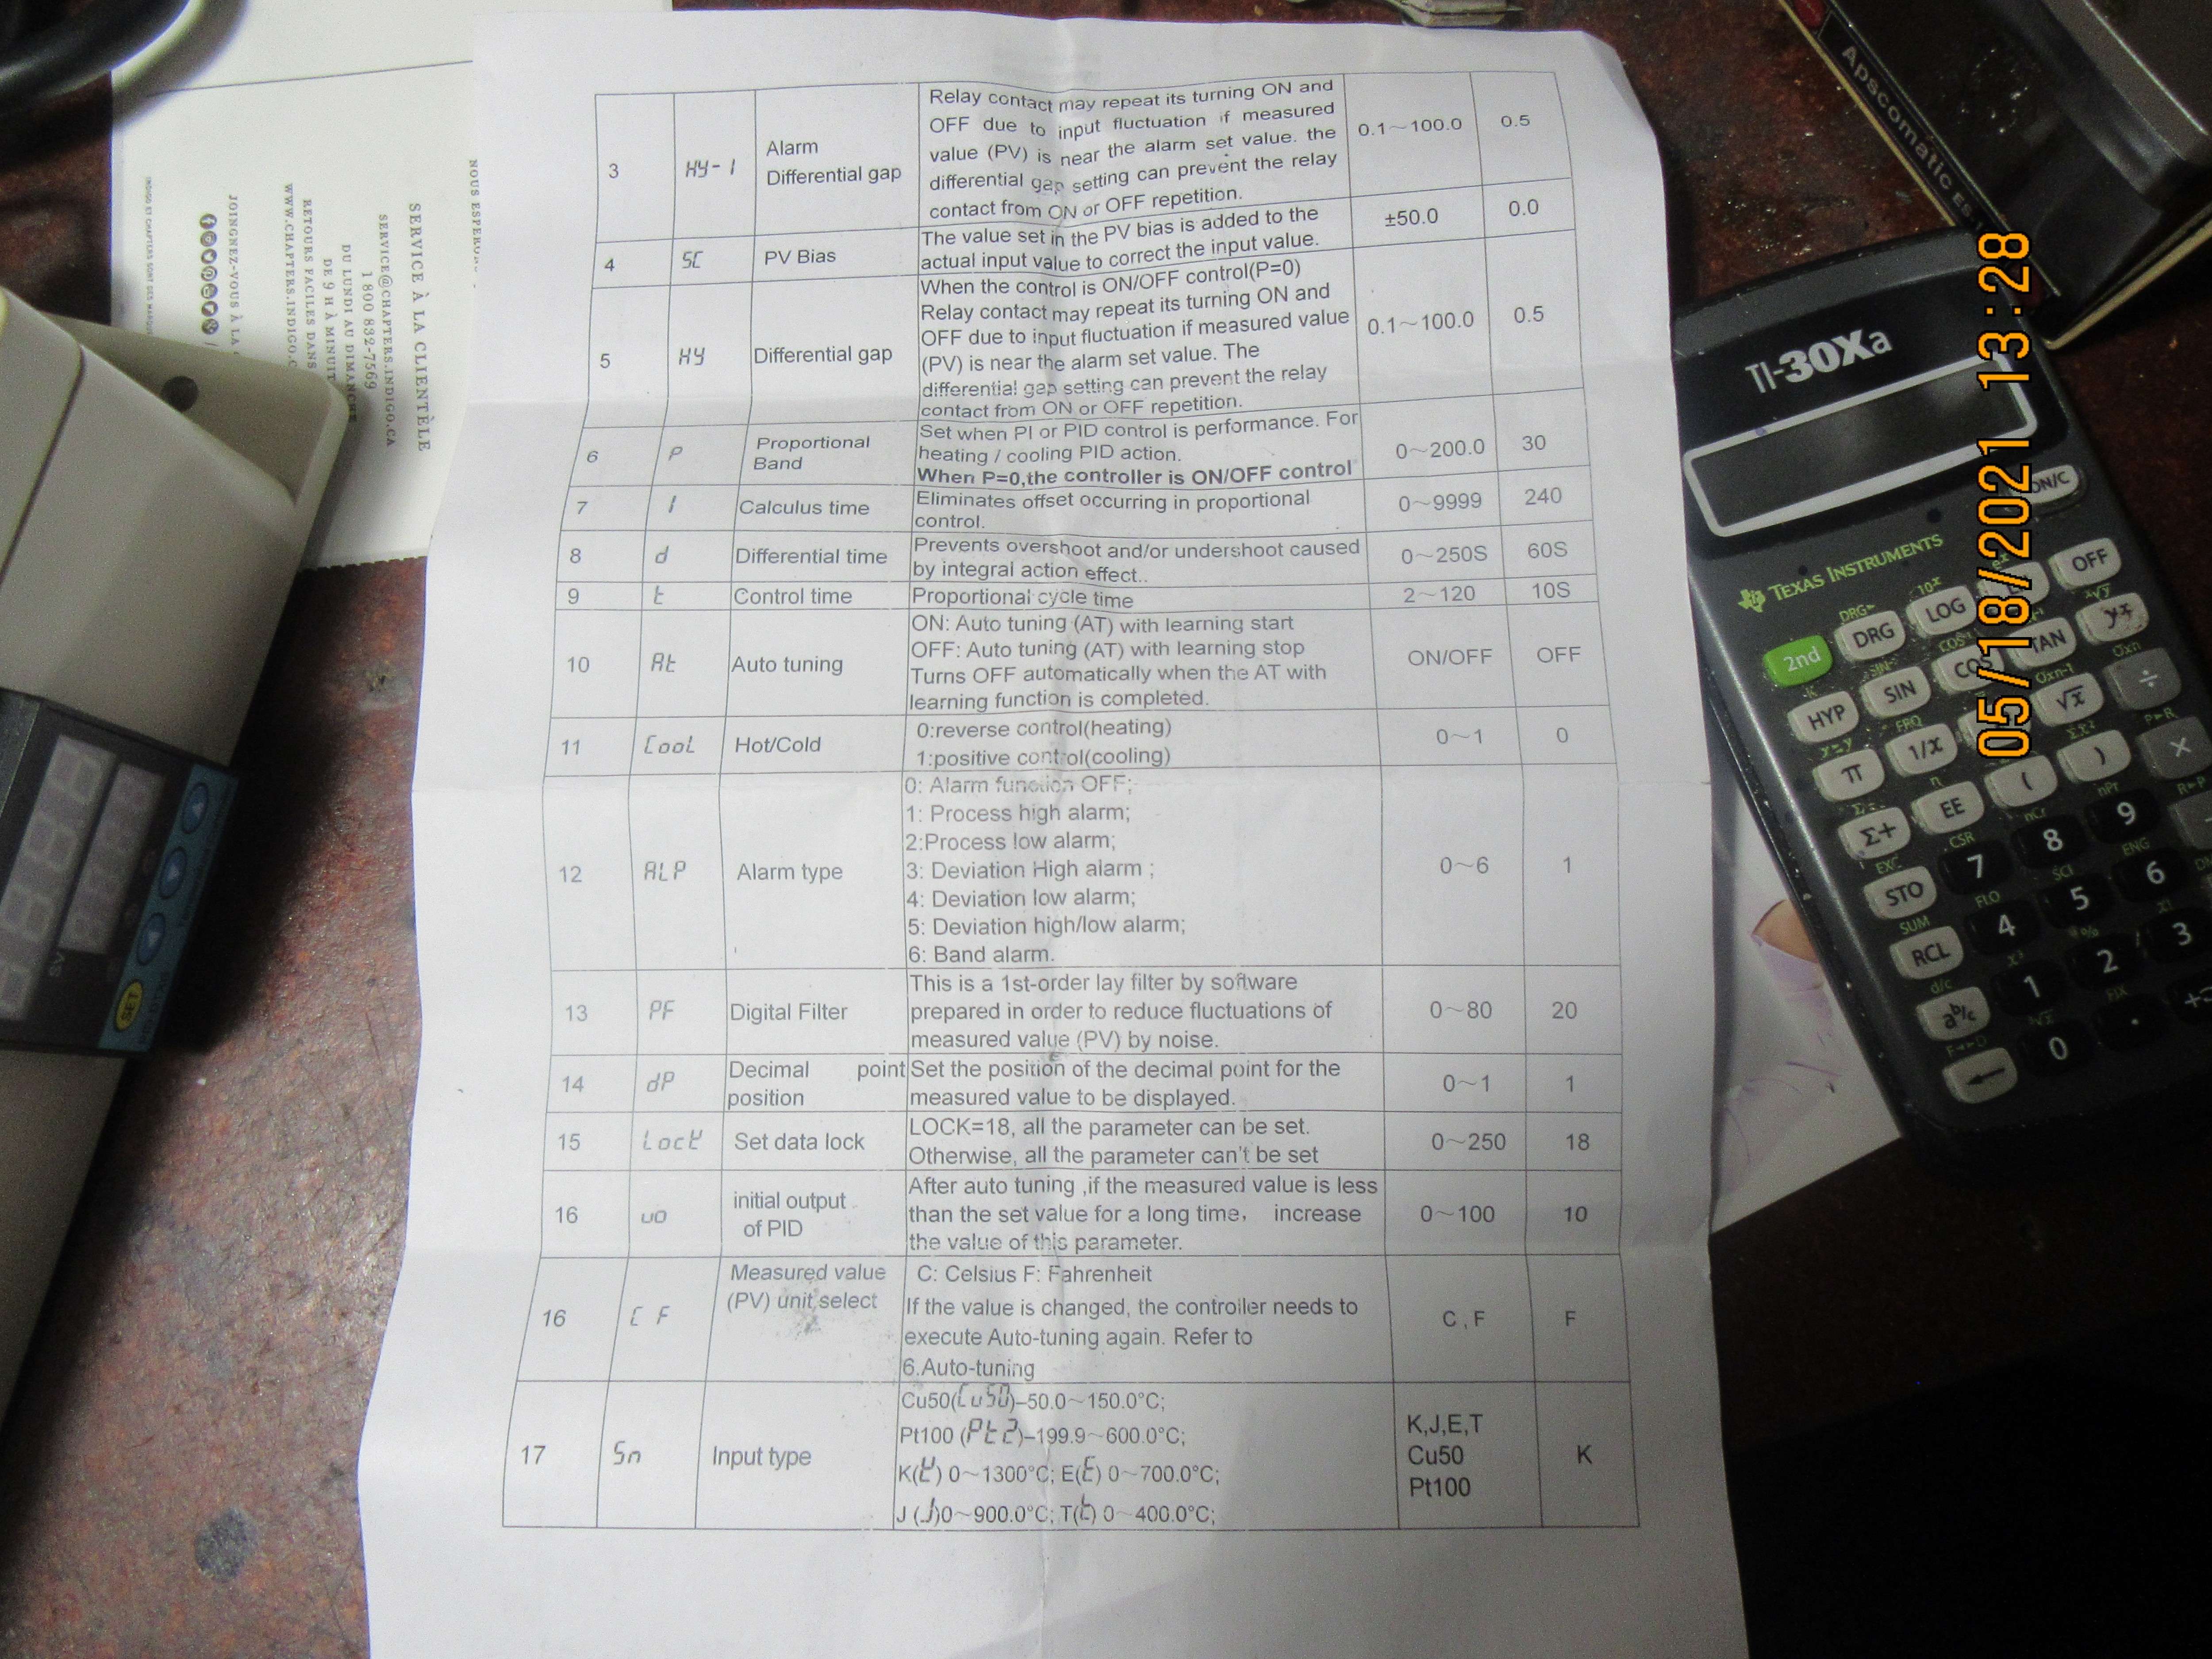
Programming is done in two ways. If you just press and release the SET button for 1 second you can change the 'setting value', which is the temperature that you want the oven to be running at. If you press and hold the SET button for 3 seconds you'll enter into programming mode where you can change how the controller operates. The goal is to get the unit all set up so that the only thing you have to change from here on is the 'setting value' when you want to change the temperature of the oven.
When you enter programming mode the top display should have a number corresponding to the ID number in the parameter chart and the bottom display should display the current value of that parameter. I think. The top display may also end up showing the Code for the parameter, that's a pretty common thing to see. If I'm reading correctly pushing the SET button will let you scroll through the different parameters and pushing the up/down arrows will allow you to change the value of a parameter. When you have changed a parameter make sure to push the SET button to lock in that change, otherwise the controller won't save the change and will revert back to it's old setting. It doesn't say how to exit the programming mode, but usually if you don't push any buttons for a time controls will automatically exit.
First parameter I would check is the thermocouple type, which will be either '17' or 'Sn'. Check that it matches your thermocouple type or all the measurements will be wonky.
Second parameter I would check is the units, either '16' or 'C F'. Set this to your preference.
Third parameter I would check is that alarm, either '12' or 'ALP'. It should be set to 1 from the factory, I would turn it to 0 to turn off the alarm for now. You can turn it back on later if needed.
Fourth parameter I would check is AutoTune, either '10' or 'At'. It will be 'OFF' from the factory, turn it 'ON'. What this will do is allow the controller to learn how your oven functions and how best to run the elements to keep it at a steady heat level. You'll need to run this any time you make a change such as moving the thermocouple, so that the controller can re-tune itself. Once it has run an auto-tune you should not need to run it again and it will automatically turn back to 'OFF'.
Last parameter to check is the Setting Value, either '1' or 'SP'. Set this to your target temperature.
Allow the controller to exit programming mode (if it doesn't automatically exit try pressing and holding the SET key, the manual doesn't explain how to exit programming mode so I'm making a guess here) and you should be good to go. When it's running the top display should show the temperature the thermocouple is reading, the bottom display will be the target temperature you programmed in. There are 3 indicator lights to the left side, the top one is for an alarm (and won't light up unless you turn the alarm back on), the middle one indicates that AutoTuning is occuring, and the bottom one indicates when the control relay is closed. If the AutoTuning light is lit I think you will need to leave the unit alone to run it's tests until it's done AutoTuning, otherwise it will restart AutoTuning the next time you turn the unit on. If that light is on best to let the controller do it's thing and wait until it's completed.
Hopefully that makes some sense. Let us know if anything is different or doesn't match up with what you're seeing during programming. Once you have the oven up and running you can let us know if it's behaving like you had hoped and we can suggest adjustments to make if needed.
Cayuga, Ontario, CanadaComment
-
ah, sorry, missed that. Further agreeing with Tom S.Originally posted by brian Rupnow View Post
Comment


Comment